First EJB 3 Tutorial explaining Ant and showing how to create a session and entity beans with annotations and JBoss.
This tutorial explains basics about EJB3 and shows a simple work through to set up a EJB 3 project, create a entity bean and a session bean facade using Eclipse and Ant.Ant and creating of build files with Ant is described in detail. This could be your Ant primer as well.
General
Author: Sebastian Hennebrueder
Date: March, 15th 2006
Used software and frameworks
Eclipse 3.1
Ant as included in Eclipse
Source code: http://www.laliluna.de/download/first-ejb3-ant-tutorial.zip
PDF version of the tutorial:
http://www.laliluna.de/download/first-ejb3-ant-tutorial-en.pdf
Table of Content
First EJB 3 Ant Tutorial 1
General 1
EJB 3 Basics 2
Entity Beans 2
Session Beans 2
Message Driven Beans 2
Set up a Java project 2
Add needed libraries to the project. 3
Create an Entity Bean 4
Adding the Annotations 6
Sequence primary key 7
Identity primary key 7
Table based primary key 7
JNDI data source 7
Stateless Session Bean 8
Create local and remote interfaces 8
Building your application with Ant 10
Ant build files 11
Basic configuration 11
Build in properties 12
Target explanation 13
Running Ant in Eclipse 14
Using a property file (build.properties) 14
Deploy the application 16
Create a test client 17
Copyright and disclaimer 18
EJB 3 Basics
J2EE is a technology from Sun to develop multi tier applications. It is a standard which is implemented by many container providers. The container provides functionality like transaction management, clustering, caching, messaging between applications or in an application and much more. EJB 3 is becoming the next version of EJB. In March 2006, there are first demo implementations by some application server providers. This tutorial uses JBoss as application server.
An EJB (Enterprise Java Bean) is a special kind of class. There are three major types of EJBs.
Entity Beans
They can be used to map an entry in a database table to a class. (Object Relational Mapping) Instead of using result Sets from a database query you work with a class. The application server provides the functionality to load, update or delete the values of a class instance to the database.
Session Beans
Session beans are used to implement the functionality of your application. There are two kind of session beans: Stateful and Stateless.
A stateful session bean is for example a shopping cart class. The state is the cart holding the shopping items and the quantity. The cart class is hold in your application session and disposed at the end when the user checked out.
A stateless bean is a short living class. A typical example is a MailSender class sending a message. You call a method and dispose it. With a application server you do not instantiate the class each time you need it. The application server passes an instance from a pool. This is more efficient.
Message Driven Beans
Message beans provide functionality to implement messaging in your business logic. When you want to send a message to one or more recipients to start another business logic, you can use message beans. A Shop application could send a order message to the Warehouse management. Once the warehouse management software is started, it receives the orders from the shop application.
Set up a Java project
Create a new Java project.
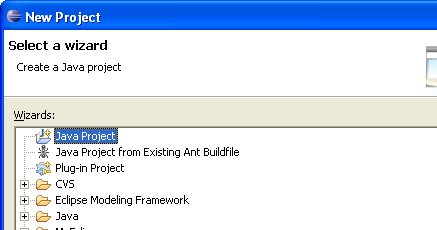
I used FirstEjb3Tutorial as name.
As we are going to use Entity beans, we need some kind of datasource. This can be configured in a file named persistence.xml.
Create a folder META-INF and a file named persistence.xml in this folder.
JBoss supports the tag hibernate.hbm2ddl.auto to define if your tables are created or udpated during redeployment. I chose create-drop to have them dropped after each undeployment, so that they can be nicely recreated. The option update does not work sometimes.
<persistence>
<persistence-unit name="FirstEjb3Tutorial">
<jta-data-source>java:/ejb3ProjectDS</jta-data-source>
<properties>
<property name="hibernate.hbm2ddl.auto"
value="create-drop"/>
</properties>
</persistence-unit>
</persistence>
Add needed libraries to the project.
We will need some libraries during development of ejb3 and some for using a remote client to test our application later on.
You need to collect the libraries together. I recommend to pack them into a user library. Than you will have this work only once.
Download JBoss EJB3 at http://www.jboss.org/products/list/downloads
Get all the libraries we need from this package.
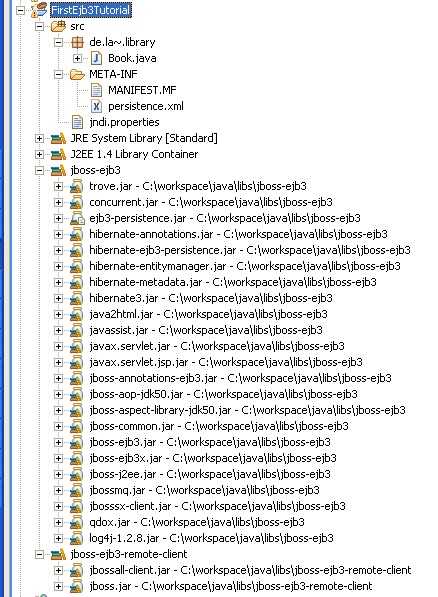
Than have a look into your JBoss directory. We will need the jbossallclient.jar and the jboss.jar.
My directory when I am working under Windows:
E:jboss-4.0.4RC1client
There is a fair chance that I selected to many libraries. Try if you like which one you can delete.
Create an Entity Bean
Create a new class Book in the package de.laliluna.library
Add the attributes
	private Integer id;
	private String title;
	private String author;
Select Generate Getter/Setter from the Source Menu.
In Eclipse you can reach the function with Alt+Shift + S or with the context menu (right mouse click) of the source code.
Add the following constructors and implement the toString method. (Alt+Shift+S + Override/Implement methods). This is useful for debugging.
 public Book() {
		super();
	}

	public Book(Integer id, String title, String author) {
		super();
		this.id = id;
		this.title = title;
		this.author = author;
	}
	@Override
	public String toString() {

		return "Book: " + getId() + " Title " + getTitle() + " Author "
				+ getAuthor();
	}
Implement the interface java.io.Serializable. It is a marker interface. This means you do not have to implement any methods (normally).
Finally, this is our full source code now:
package de.laliluna.library;

import java.io.Serializable;

/**
* @author hennebrueder
*
*/
public class Book implements Serializable {
	/**
	 *
	 */
	private static final long serialVersionUID = 7422574264557894633L;

	private Integer id;

	private String title;

	private String author;

	public Book() {
		super();
	}

	public Book(Integer id, String title, String author) {
		super();
		this.id = id;
		this.title = title;
		this.author = author;
	}
	@Override
	public String toString() {

		return "Book: " + getId() + " Title " + getTitle() + " Author "
				+ getAuthor();
	}
	public String getAuthor() {
		return author;
	}
	public void setAuthor(String author) {
		this.author = author;
	}
	public Integer getId() {
		return id;
	}
	public void setId(Integer id) {
		this.id = id;
	}
	public String getTitle() {
		return title;
	}
	public void setTitle(String title) {
		this.title = title;
	}
}
Recommendation
In general I recommend to do the following with all Domain objects, especially when you use them as Entity Beans. Domain objects
are things like Address, Book, Customer in contrast to business logic like MailFactory, AuthorizeFilter.
Create an
empty constructor and a useful one. The empty is sometimes needed for reflection.
Implement the interface
java.io.Serializable as entity beans are frequently serialized by caches, by the entity manager etc.
Overwrite the
toString method because a meaningful output is useful for debugging.
Adding the Annotations
Now, we will add the annotations:
@Entity
@Table(name="book")
@SequenceGenerator(name = "book_sequence", sequenceName = "book_id_seq")
public class Book implements Serializable {
Entity defines that this is an entity bean. The second defines the table name. The last one defines a sequence generator.
Primary keys can be generated in different ways:
You can assign them. For example a language table and the primary key is the ISO-Country code
id: EN,DE,FR, ....
Use a sequence for PostgreSql, SapDb, Oracle and other . A sequence is a database feature. It returns the next Integer or Long value each time it is called.
In MsSql and other you can use identity.
Sequence primary key
I am using PostgreSql, so I defined the sequence first in Order to use it later for my primary key. In front of the getId I configure the ID and the generation approach.
@Id
@GeneratedValue(strategy = GenerationType.SEQUENCE, generator = "book_sequence")
public Integer getId() {
return id;
}
Important
generator = "book_sequence" referes to the named defined in front of your class
Identity primary key
For MSSql Server you will probably only need
@Id
@GeneratedValue(strategy = GenerationType.IDENTITY)
public Integer getId() {
return id;
}
I am sorry, but I could not test this. It may not work.
Table based primary key
Here is one solution that always works: It safes the primary keys in a separated table. One row for each primary key. Define it in front of your class:
@TableGenerator(  name="book_id", table="primary_keys", pkColumnName="key", pkColumnValue="book",
		valueColumnName="value")
and use it:
@Id
@GeneratedValue(strategy = GenerationType.TABLE, generator = "book_id")
public Integer getId() {
Important
generator = "book_id referes to the name defined in front of your class @TableGenerator( name="book_id"
JNDI data source
Download your database driver and put it into JBOSS_HOMEserverdefaultlib. Restart your server.
Create a file named myFavouriteName-ds.xml. There is a naming convention. Please keep the bold text. You can find a lot of examples for different databases in the installation path of JBoss. JBOSS_HOME/docs/examples/jca
A datasource for PostgreSql looks like
<?xml version="1.0" encoding="UTF-8"?>

<datasources>
<local-tx-datasource>
<jndi-name>ejb3ExampleDS</jndi-name>
<connection-url>jdbc:postgresql://localhost:5432/examples</connection-url>
<driver-class>org.postgresql.Driver</driver-class>
<user-name>postgres</user-name>
<password>p</password>
<!-- the minimum size of the connection pool -->
<min-pool-size>1</min-pool-size>
<!-- The maximum connections in a pool/sub-pool -->
<max-pool-size>4</max-pool-size>
</local-tx-datasource>
</datasources>
Stateless Session Bean
A stateless session bean has not state, i.e. It performs some actions and is thrown away afterwards. Therefore it is not suitable as shopping cart class. The shopping cart must save the cart information during multiple requests. It has a state => you would use a stateful session bean.
Create local and remote interfaces
The local interface should be used by default, because it is much faster. The remote interface should only be used when the client is not running in the same virtual machine. Remote access even works over the network and has a lot of overhead.
Create a interface named BookTestBeanLocal in the package de.laliluna.library.
We mark this interface as local interface by the annotation @Local.
package de.laliluna.library;
import javax.ejb.Local;

@Local
public interface BookTestBeanLocal {
	public void test();
}
Create a interface named BookTestBeanRemote in the package de.laliluna.library;
package de.laliluna.library;
import javax.ejb.Remote;

@Remote
public interface BookTestBeanRemote {
	public void test();
}
Now we will create the actual Stateless Session Bean.
Create a new class named in the same package as the interfaces and let it implement the local and the remote interface.
You configure a class as stateless bean by adding the @Stateless annotation.
package de.laliluna.library;

import javax.ejb.Stateless;
import javax.persistence.EntityManager;
import javax.persistence.PersistenceContext;

@Stateless
public class BookTestBean implements BookTestBeanLocal, BookTestBeanRemote {
	@PersistenceContext
	EntityManager em;
	public static final String RemoteJNDIName =  BookTestBean.class.getSimpleName() + "/remote";
	public static final String LocalJNDIName =  BookTestBean.class.getSimpleName() + "/local";
}
We want to access the book bean, so we need a EntityManager. The EntityManager provides all methods needed to select, update,lock or delete entities, to create SQL and EJB-QL queries.
	@PersistenceContext
	EntityManager em;
The annotation @PersistenceContext tells the application server to inject a entity manager during deployment. Injection means that the entity manager is assigned by the application server.
This is very useful approach frequently used in the Spring Framework or other Aspect Oriented Framework. The idea is:
A data access class should not be responsible for the persistenceContext. My configuration decides which context for which database it receives. Imagine you hard code a context in 25 classes and than want to change the context.
I like it to have the JNDI name of my class somewhere, so I do not have to type it. This is why I added the following lines.
	public static final String RemoteJNDIName =  BookTestBean.class.getSimpleName() + "/remote";
	public static final String LocalJNDIName =  BookTestBean.class.getSimpleName() + "/local";
Implementing the test method. The following test method creates an entry, selects some and deletes an entry as well. Everything is done using the entity manager. You may read in the API about the other methods of this manager.
/**
*
* @author Sebastian Hennebrueder
* created Mar 15, 2006
* copyright 2006 by http://www.laliluna.de
*/
package de.laliluna.library;
import java.util.Iterator;
import java.util.List;
import javax.ejb.Stateless;
import javax.persistence.EntityManager;
import javax.persistence.PersistenceContext;

@Stateless
public class BookTestBean implements BookTestBeanLocal, BookTestBeanRemote {

	@PersistenceContext
	EntityManager em;

	public static final String RemoteJNDIName =  BookTestBean.class.getSimpleName() + "/remote";

	public static final String LocalJNDIName =  BookTestBean.class.getSimpleName() + "/local";

	public void test() {
		Book book = new Book(null, "My first bean book", "Sebastian");
		em.persist(book);
		Book book2 = new Book(null, "another book", "Paul");
		em.persist(book2);
		Book book3 = new Book(null, "EJB 3 developer guide, comes soon",
				"Sebastian");
		em.persist(book3);

		System.out.println("list some books");
		List someBooks = em.createQuery("from Book b where b.author=:name")
				.setParameter("name", "Sebastian").getResultList();
		for (Iterator iter = someBooks.iterator(); iter.hasNext();)
		{
			Book element = (Book) iter.next();
			System.out.println(element);
		}
		System.out.println("List all books");
		List allBooks = em.createQuery("from Book").getResultList();
		for (Iterator iter = allBooks.iterator(); iter.hasNext();)
		{
			Book element = (Book) iter.next();
			System.out.println(element);
		}
		System.out.println("delete a book");
		em.remove(book2);
		System.out.println("List all books");
		 allBooks = em.createQuery("from Book").getResultList();
		for (Iterator iter = allBooks.iterator(); iter.hasNext();)
		{
			Book element = (Book) iter.next();
			System.out.println(element);
		}
	}
}
Building your application with Ant
Ant is a build application which can compile your application, pack them into jar, war, rar files, which are all zipped files, It can generate javadoc, run tests and jdbc scripts. To sum up, it provides everything needed for building and deploying your application.
Ant build files
In order to use Ant you must create a build file with instructions what Ant should do. The build file is by default named build.xml but you may use any name you like.
It starts with a part defining properties, which are variables which can be reused within the build file. Very often you will find a path definition to define the location of external libraries and finally many targets.
A target include different kind of jobs of compiling, copying, deleting, building of libraries etc.
You can define another target which have to be done before the current task is started. This is done by specifying depends=?FirstRunThisTask? in the task configuration.
Below you can find extracts of the build file.
<?xml version="1.0" encoding="ISO-8859-1"?>
<project name="FirstEJB3Tutorial Ant" basedir="." default="deploy">
<property name="project.libs" value="../java/libs/jboss-ejb3" />
<property ......

<path id="base.path">
.....
</path>
<target name="clean" description="Delete all generated files">
.......
</target>

<target name="compile" description="Compiles the Task">
.......
</target>

<target name="deploy" description="JARs the Task" depends="compile">
........
</target>

<target name="undeploy" description="Undeploy jar from server">
......
</target>
</project>
Basic configuration
Below you can find the complete build file. Have a look at it, I will explain every part step by step.
 <?xml version="1.0" encoding="ISO-8859-1"?>
<project name="FirstEJB3Tutorial Ant" basedir="." default="deploy">

<property name="project.libs" value="../java/libs/jboss-ejb3" />
<property name="classes.dir" value="classes" />
<property name="deploy.dir" value="E:/jboss-4.0.4RC1/server/default/deploy" />
<property name="src.dir" value="src"></property>


<path id="base.path">
<fileset dir="${project.libs}">
<include name="**/*.jar" />
</fileset>
</path>
<target name="clean" description="Delete all generated files">
<delete dir="${classes.dir}" />
</target>

<target name="compile" description="Compiles the Task">
<mkdir dir="${classes.dir}" />
<javac srcdir="${src.dir}" destdir="${classes.dir}">
<classpath>
<path refid="base.path" />
</classpath>
</javac>
</target>

<target name="deploy" description="JARs the Task" depends="compile">
<jar destfile="${deploy.dir}/${ant.project.name}.jar">
<metainf dir="${src.dir}/META-INF" />
<fileset dir="${classes.dir}">
<include name="de/**/*.class" />
</fileset>
</jar>
</target>

<target name="undeploy" description="Undeploy jar from server">
<delete file="${deploy.dir}/${ant.project.name}.jar" />
</target>
</project>
First we define properties, which will be used in the task. By convention directories are named myDirectory.dir.
 <property name="project.libs" value="../java/libs/jboss-ejb3" />
<property name="classes.dir" value="classes" />
<property name="deploy.dir" value="E:/jboss-4.0.4RC1/server/default/deploy" />
<property name="src.dir" value="src"></property>
We can use a property by using
${thePropertyName}
You can even reuse properties to define properties.
	<property name="doc" location="aDirectory"/>
	<property name="api" location="${doc}/api"/>
Build in properties
Ant has a large selection of build in properties. They contain information about the system, your project, JAVA_HOME etc.
The undeploy task uses the build in property ant.project.name
<delete file="${deploy.dir}/${ant.project.name}.jar" />
Have a look in the Ant documentation to get an overview over this properties.
Target explanation
The following target is named clean. It contains a job, which deletes all the files located in the ${classes.dir}.
 <target name="clean" description="Delete all generated files">
<delete dir="${classes.dir}" />
</target>
The next target calls the Java compiler javac. All source files found in srcdir are compiled. The compiled classes can be found in destdir afterwards. Interesting here is the classpath definition <classpath>. When you use external libraries like Struts, Hibernate or the EJB 3 libraries in this project, you must inform the compiler where to find the libraries. This is done by the class path tag.
 <target name="compile" description="Compiles the Task">
<mkdir dir="${classes.dir}" />
<javac srcdir="${src.dir}" destdir="${classes.dir}">
<classpath>
<path refid="base.path" />
</classpath>
</javac>
</target>
We defined the class path at the beginning of the build file.
 <path id="base.path">
<fileset dir="${project.libs}">
<include name="**/*.jar" />
</fileset>
</path>
It includes all jar files in the project.libs directory and its sub directories. Wildcards like * are a little complicated with Ant. You frequently need double ** in order to find your files.
The next target contains a jar task. When you run this target, it will first call the compile target as it depends on it. It will jar all files included in the fileset. You can add multiple include as well as exclude definitions within a file set.
 <target name="deploy" description="JARs the Task" depends="compile">
<jar destfile="${deploy.dir}/${ant.project.name}.jar">
<metainf dir="${src.dir}/META-INF" />
<fileset dir="${classes.dir}">
<include name="de/**/*.class" />
</fileset>
</jar>
</target>
Interesting here is the wildcard usage:
<include name="de/**/*.class" />
It includes all class files in the de package and its subpackages. Once again we need a double **.
Our last target is not complex, as well. It just deletes the deployed files.
 <target name="undeploy" description="Undeploy jar from server">
<delete file="${deploy.dir}/${ant.project.name}.jar" />
</target>
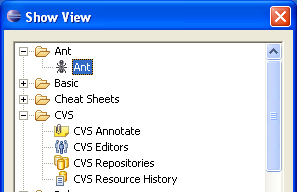
Running Ant in Eclipse
Select from the menu window -> show view and choose the Ant View.
Either
drag and drop build files from your package view to the Ant view or click with the right mouse button to call the context menu and
choose add build file.
Having added our build file, the Ant Views shows the different targets. Double click on a target to start it.
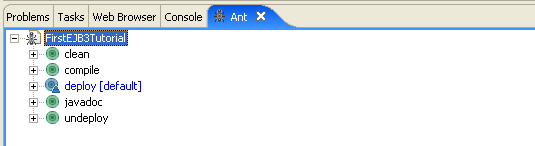
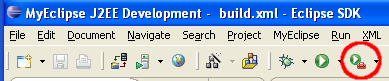
You can
rerun the last target by clicking on the following symbol as well.
Using a property file (build.properties)
You will have probably seen build.properties file frequently in projects. It is a convention to name it build.properties but you can give it any name you like.
You must define a property file in your build.xml:
<property file="build.properties" />
Below you can find the property file and a complete build file using it.
# src directory
src.dir=src
# target compilation directory
classes.dir=classes
#deployment folder of the application server
deploy.dir=E:/jboss-4.0.4RC1/server/default/deploy
#file created as target for java doc
api=javadoc
#location of the jboss EJB 3 libraries
project.libs=../java/libs/jboss-ejb3
#some settings describing the project
version=1.0
projectname=First EJB 3 Tutorial
author=Sebastian Hennebrueder
copyright=(c) 2006 by laliluna.de
<?xml version="1.0" encoding="ISO-8859-1"?>
<project name="FirstEJB3Tutorial" basedir="." default="deploy">


<property file="build.properties" />
<path id="base.path">
<fileset dir="${project.libs}">
<include name="**/*.jar" />
</fileset>

</path>
<target name="clean" description="Delete all generated files">
<delete dir="${classes.dir}" />

</target>

<target name="compile" description="Compiles the Task">
<mkdir dir="${classes.dir}" />
<javac srcdir="${src.dir}" destdir="${classes.dir}">
<classpath>
<path refid="base.path" />
</classpath>
</javac>
</target>

<target name="deploy" description="JARs the Task" depends="compile">
<jar destfile="${deploy.dir}/${ant.project.name}.jar">
<metainf dir="${src.dir}/META-INF" />
<fileset dir="${classes.dir}">
<include name="de/**/*.class" />
</fileset>
</jar>
</target>

<target name="undeploy" description="Undeploy jar from server">
<delete file="${deploy.dir}/${ant.project.name}.jar" />
</target>

<!-- Generate Javadoc -->
<target name="javadoc" description="Generates the javadoc">
<mkdir dir="${javadoc}" />

<javadoc bottom="${projectname} by ${author} - ${copyright}" destdir="${api}" doctitle="Javadocs: ${projectname} ${version}" private="false" version="false" windowtitle="Javadocs: ${projectname} ${version}"  classpathref="base.path">
<sourcepath>
<pathelement path="${src.dir}" />
</sourcepath>

<packageset dir="${src.dir}">
<include name="de/**" />
</packageset>
<link href="http://java.sun.com/j2se/1.4/docs/api/" />
<link href="http://java.sun.com/products/servlet/2.3/javadoc/" />
</javadoc>
</target>
</project>
Deploy the application
Deploy the application now by running the Ant target. It must be deployed as jar.
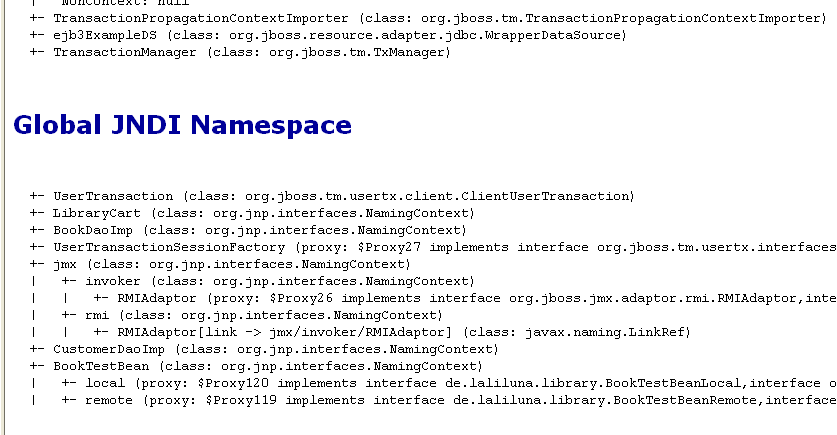
Than open the jmx-console to verify the deployment.
http://localhost:8080/jmx-console/
Select the JNDI View and list to show all deployed beans.
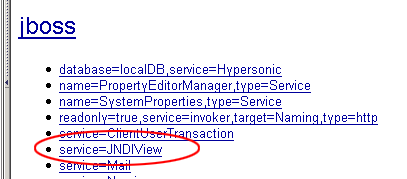
You
should see something like the following when the deployment was successful.
Create a test client
First, create a simple log4j.properties file in the src folder.
Add the following content:
### direct log messages to stdout ###
log4j.appender.stdout=org.apache.log4j.ConsoleAppender
log4j.appender.stdout.Target=System.out
log4j.appender.stdout.layout=org.apache.log4j.PatternLayout
log4j.appender.stdout.layout.ConversionPattern=%d{ABSOLUTE} %5p %c{1}:%L - %m%n

### direct messages to file hibernate.log ###
#log4j.appender.file=org.apache.log4j.FileAppender
#log4j.appender.file.File=hibernate.log
#log4j.appender.file.layout=org.apache.log4j.PatternLayout
#log4j.appender.file.layout.ConversionPattern=%d{ABSOLUTE} %5p %c{1}:%L - %m%n

### set log levels - for more verbose logging change 'info' to 'debug' ###

log4j.rootLogger=debug, stdout
Then create a class named FirstEJB3TutorialClient in the package test.de.laliluna.library.
Either create a file named jndi.properties in the src directory.
java.naming.factory.initial=org.jnp.interfaces.NamingContextFactory
java.naming.factory.url.pkgs=org.jboss.naming:org.jnp.interfaces
java.naming.provider.url=localhost:1099
and use
context = new InitialContext();
Or configure the JNDI in your application:
	Properties properties = new Properties();
		properties.put("java.naming.factory.initial","org.jnp.interfaces.NamingContextFactory");
		properties.put("java.naming.factory.url.pkgs","=org.jboss.naming:org.jnp.interfaces");
		properties.put("java.naming.provider.url","localhost:1099");
		Context context = new InitialContext(properties);
Anyway here is the full source code of the test client:
/**
*
* @author Sebastian Hennebrueder
* created Mar 15, 2006
* copyright 2006 by http://www.laliluna.de
*/
package test.de.laliluna.library;

import java.util.Properties;
import javax.naming.Context;
import javax.naming.InitialContext;
import javax.naming.NamingException;
import de.laliluna.library.BookTestBean;
import de.laliluna.library.BookTestBeanRemote;

/**
* @author hennebrueder
*
*/
public class FirstEJB3TutorialClient {

	/**
	 * @param args
	 */
	public static void main(String[] args) {
		/* get a initial context. By default the settings in the file
		 * jndi.properties are used.
		 * You can explicitly set up properties instead of using the file.
Properties properties = new Properties();
properties.put("java.naming.factory.initial","org.jnp.interfaces.NamingContextFactory");
properties.put("java.naming.factory.url.pkgs","=org.jboss.naming:org.jnp.interfaces");
	properties.put("java.naming.provider.url","localhost:1099");
*/

		Context context;
		try
		{
			 context = new InitialContext();
			 BookTestBeanRemote beanRemote = (BookTestBeanRemote) 					     context.lookup(BookTestBean.RemoteJNDIName);
			beanRemote.test();
		} catch (NamingException e)
		{
			e.printStackTrace();
			/* I rethrow it as runtimeexception as there is really no need to continue if an exception happens and I
			 * do not want to catch it everywhere.
			 */
			throw new RuntimeException(e);
		}
	}
}
That's it. You have successfully created your first EJB 3 application.
Copyright and disclaimer
This tutorial is copyright of Sebastian Hennebrueder, laliluna.de. You may download a tutorial for your own personal use but not redistribute it. You must not remove or modify this copyright notice.
The tutorial is provided as is. I do not give any warranty or guaranty any fitness for a particular purpose. In no event shall I be liable to any party for direct, indirect, special, incidental, or consequential damages, including lost profits, arising out of the use of this tutorial, even if I has been advised of the possibility of such damage.